Linux Server Security: Cloud Firewall Setup
Learn how to enhance your Linux server security with this easy-to-follow guide on setting up a cloud firewall.
Most server providers offer the option to set up a cloud firewall for your servers, allowing you to create a more advanced firewall setup.
With a cloud firewall, you’ll have both an OS-level firewall and a cloud-level firewall, effectively employing two firewalls working together.
This guide will discuss the benefits of using a cloud firewall and how to set one up, along with providing some tips about best practices.
Benefits
An advantage of having a configured and enabled cloud firewall is that if you accidentally add a rule that might lock you out from your server, you won’t be stranded.
The cloud firewall is accessible through the provider’s dashboard, allowing you to make changes as needed.
In my guide about setting up a firewall using UFW, I discussed the challenge of restricting the SSH port to our home network IP, which can change due to DHCP.
That’s why I prefer using the cloud firewall for rules that might change in the future.
Here’s my approach: I configure the UFW firewall with no specific restrictions. For example, for SSH, I allow SSH traffic from all sources on the UFW firewall. However, on the cloud firewall, I specifically restrict SSH to my IP. This way, whenever my IP changes, I can access the provider’s dashboard, update the IP, and regain access to the server.
Another significant advantage is the ability to link the cloud firewall with multiple servers.
This means that configuring and enabling the cloud firewall simultaneously applies to multiple servers, providing more convenience than changing the same rules individually.
You would make the change once and push it to all linked servers.
Returning to my approach, if my IP changes, and I want to update it in the firewall to regain access, I do it once, and I regain access to all servers connected to the same firewall.
Now, let’s discuss the default policy of cloud firewalls.
Default Policy
Most cloud firewalls have a default policy of blocking all incoming traffic and allowing all outgoing traffic, similar to the UFW firewall.
Hetzner follows the same policy, and it is the server provider I use for all my projects.
If you are also using Hetzner, you are good to go.
If not, make sure that the policy aligns with your OS-level firewall.
If the default policy is different and you are unable to change it, please contact support or refer to the documentation of your provider for further information.
However, it’s worth noting that almost all server providers follow the same policy.
Configuration & Activation
I will guide you through configuring and activating the cloud firewall with Hetzner.
If you are using another provider, the process should be similar.
Inside your project, go to the Firewalls tab, and click on the Create Firewall button. A new page will open where you can configure your firewall.
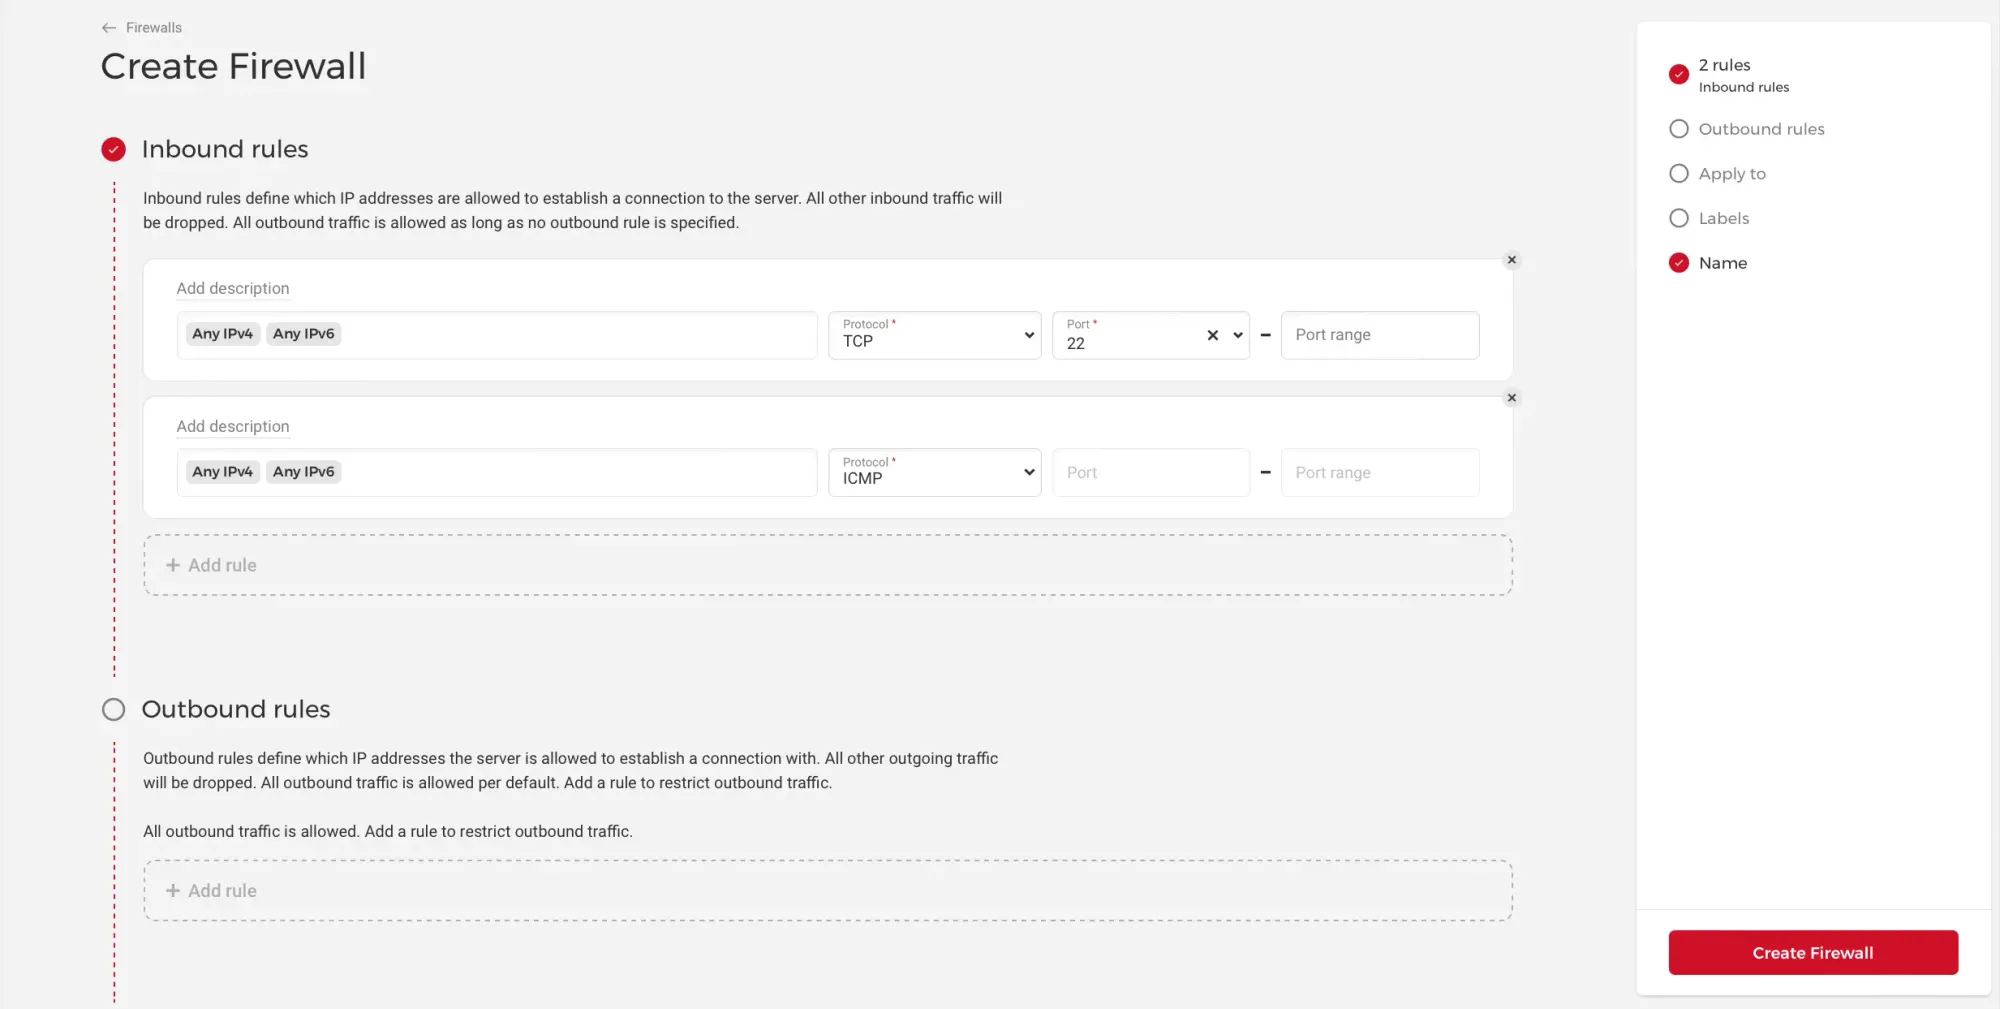
Add a description for each rule you add to ensure easy understanding of your configurations.
For the first rule, allowing traffic to port 22 (SSH), remove Any IPv4 and Any IPv6, and add only your current IP.
If your IP changes, you can always access the firewall from your dashboard and update it to the new one without any issues.
Now, for the second rule, which is allowing traffic to ICMP, it’s worth noting that many network administrators consider ICMP a security risk and opt to block it at the firewall.
While ICMP does have some security issues, it also serves important functions.
Some features are useful for troubleshooting, while others are essential for certain software to function correctly.
If you have configured a firewall using UFW on the OS level, it’s important to note that UFW has the ICMP protocol open by default. I prefer leaving it this way while controlling the ICMP protocol from the cloud firewall.
I have never experienced any issues denying traffic to ICMP, but your experience may vary. I recommend trying to deny traffic first. If a problem occurs, allow traffic again to ICMP.
If you want to deny traffic to ICMP, simply remove the second rule. If you want to allow traffic again, add the rule back.
Now, add the remaining rules according to your preferences, ensuring they align with your OS-level firewall ruleset to avoid conflicts.
I always leave the Outbound rules empty as there is nothing to add.
Once you’ve completed adding the rules, scroll down to the Apply to section, and select the servers to which you want this firewall to apply.
Scroll to the end, add a name to the firewall, and click on the Create Firewall button.
Now, you have two firewalls enabled and working together.
Conclusion and Final Thoughts
Traffic is filtered before it ever reaches your server, so a mistake in the local firewall is no longer the only thing standing between you and the internet.