How to Install and Use WordPress Locally
Learn to install and use WordPress locally with this simple step-by-step guide, perfect for safe website development and testing.
Are you planning to create a website in WordPress, but don't want to do it directly on the server?
Discover the smart solution: installing and using WordPress locally.
This approach streamlines your website creation process, allowing you to experiment and refine your site in a safe, offline environment.
In this guide, I will show you step-by-step how to install and use WordPress locally.
Plus, I'll also guide you through the process of taking your site live, ensuring a smooth transition from local development to online presence.
Why WordPress Locally?
Installing WordPress locally means your site lives on your computer.
It's your private playground – unseen by the outside world and search engines until you're ready.
This setup is ideal for creating a new site from scratch. You get to decide when it goes live.
A local WordPress site is a safe zone for experiments. Want to try new themes or plugins? Go ahead, without the fear of breaking your live site.
Updates, new features, even major redesigns – you can test them all in this secure environment.
If you're new to WordPress or coding, think of a local site as a practice area.
You can play around with WordPress files safely, without worrying about losing data or crashing your site.
It's a secure way to learn and try new things.
One of the cool things about a local WordPress site is it doesn't need the internet.
Work on your site anytime, anywhere, regardless of internet connectivity or speed. Perfect for those moments when you're offline.
And here's the best part: it's free.
Beginners can learn all about managing websites and WordPress without paying for hosting or domains. It's practical learning without spending money.
In short, a local WordPress installation is a powerful, risk-free, and cost-effective way to build and refine your WordPress skills and site.
It's all about creating, experimenting, and learning at your own pace, in your own space.
Installing WordPress Locally
To successfully install and use WordPress locally, you need to set up a few key components: a web server, PHP, and a MySQL database.
While it's possible to install these elements manually, it's not the most efficient route.
Manual installation requires individual setup and configuration for each component to create a functional local environment for WordPress.
Fortunately, there are numerous software options available that simplify this process.
These tools allow you to establish a local environment with just a few clicks, often including additional features and add-ons for an enhanced experience.
This approach saves time and reduces complexity, making it an ideal choice for both beginners and experienced users.
In this guide, we're going to use a tool called Local.
I've been using Local for a long time and I absolutely love it.
It streamlines the process, making it accessible and straightforward, even for those new to WordPress.
Go to localwp.com and click on the DOWNLOAD FOR FREE button.
You'll be prompted to select your platform.
If you're a Mac user like me, you have the option to install Local using Homebrew, a convenient alternative.
Next, you'll need to provide some basic information, including your first and last name, work email, and the type of organization you're associated with.
After filling out these details, click on the GET IT NOW! button, and the download will start automatically.
Once the download is complete, open the installation file to install Local on your computer.
Quick Overview
After installing Local, open the application to begin exploring its features.
Initially, you'll be greeted with a page indicating that you haven't created any sites yet – that's perfectly normal, as we'll be creating a new site shortly.
Local's interface is user-friendly, featuring a menu on the left with five distinct sections.
The first section displays the local WordPress sites you create, which will be empty for now.
The second section is for linking Local to WP Engine or Flywheel, enabling you to push your local site live if you have hosting with either of these providers.
The third section introduces Blueprints, a convenient feature for quickly starting new sites using pre-saved settings, including themes and plugins – ideal for replicating a site.
The fourth section contains various add-ons to enhance your Local experience.
Finally, the last section is a valuable resource for support, offering helpful articles and troubleshooting guides.
Preferences
Start by clicking the account icon and selecting Preferences.
This brings up an interface with four sections for customization.
In the Appearance & Behavior section, you can change Local's look and toggle MagicSync on or off, and set your default terminal and browser.
The New site defaults section lets you adjust default settings for new sites, like environment type, WordPress admin email, domain suffix, and file storage location.
Exporting offers an option to exclude certain files during export.
Lastly, the Advanced section is where you can adjust the router mode (which I suggest leaving as is). Here, you can also turn on the Show Develop menu option for debugging tools, and enable Usage and Error Reporting to help improve Local.
I usually keep all the default settings as they are, except for the admin email of WordPress.
Creating a Site
Now, it's time to create your new site.
Begin by clicking on the + Create a new site button.
You'll see a page where you can choose to start from scratch or use a blueprint. Since you don’t have any blueprints yet, select Create a new site.
Next, name your site. If you want, you can click on the Advanced options toggle to customize the domain and path.
For your site's environment, you can pick the Preferred option or set up a custom one. I usually choose the Preferred option.
Then, enter your WordPress username, password, and admin email. Under Advanced options , there’s also the choice to enable WordPress Multisite.
Once you've filled in all the details, click on the Add Site button, and your new site will be set up and ready to go.
Site's Dashboard
Wow, we now have a local WordPress site to play with!
Wasn't that easy? In just a few minutes and clicks, we've set up our very own local environment for WordPress.
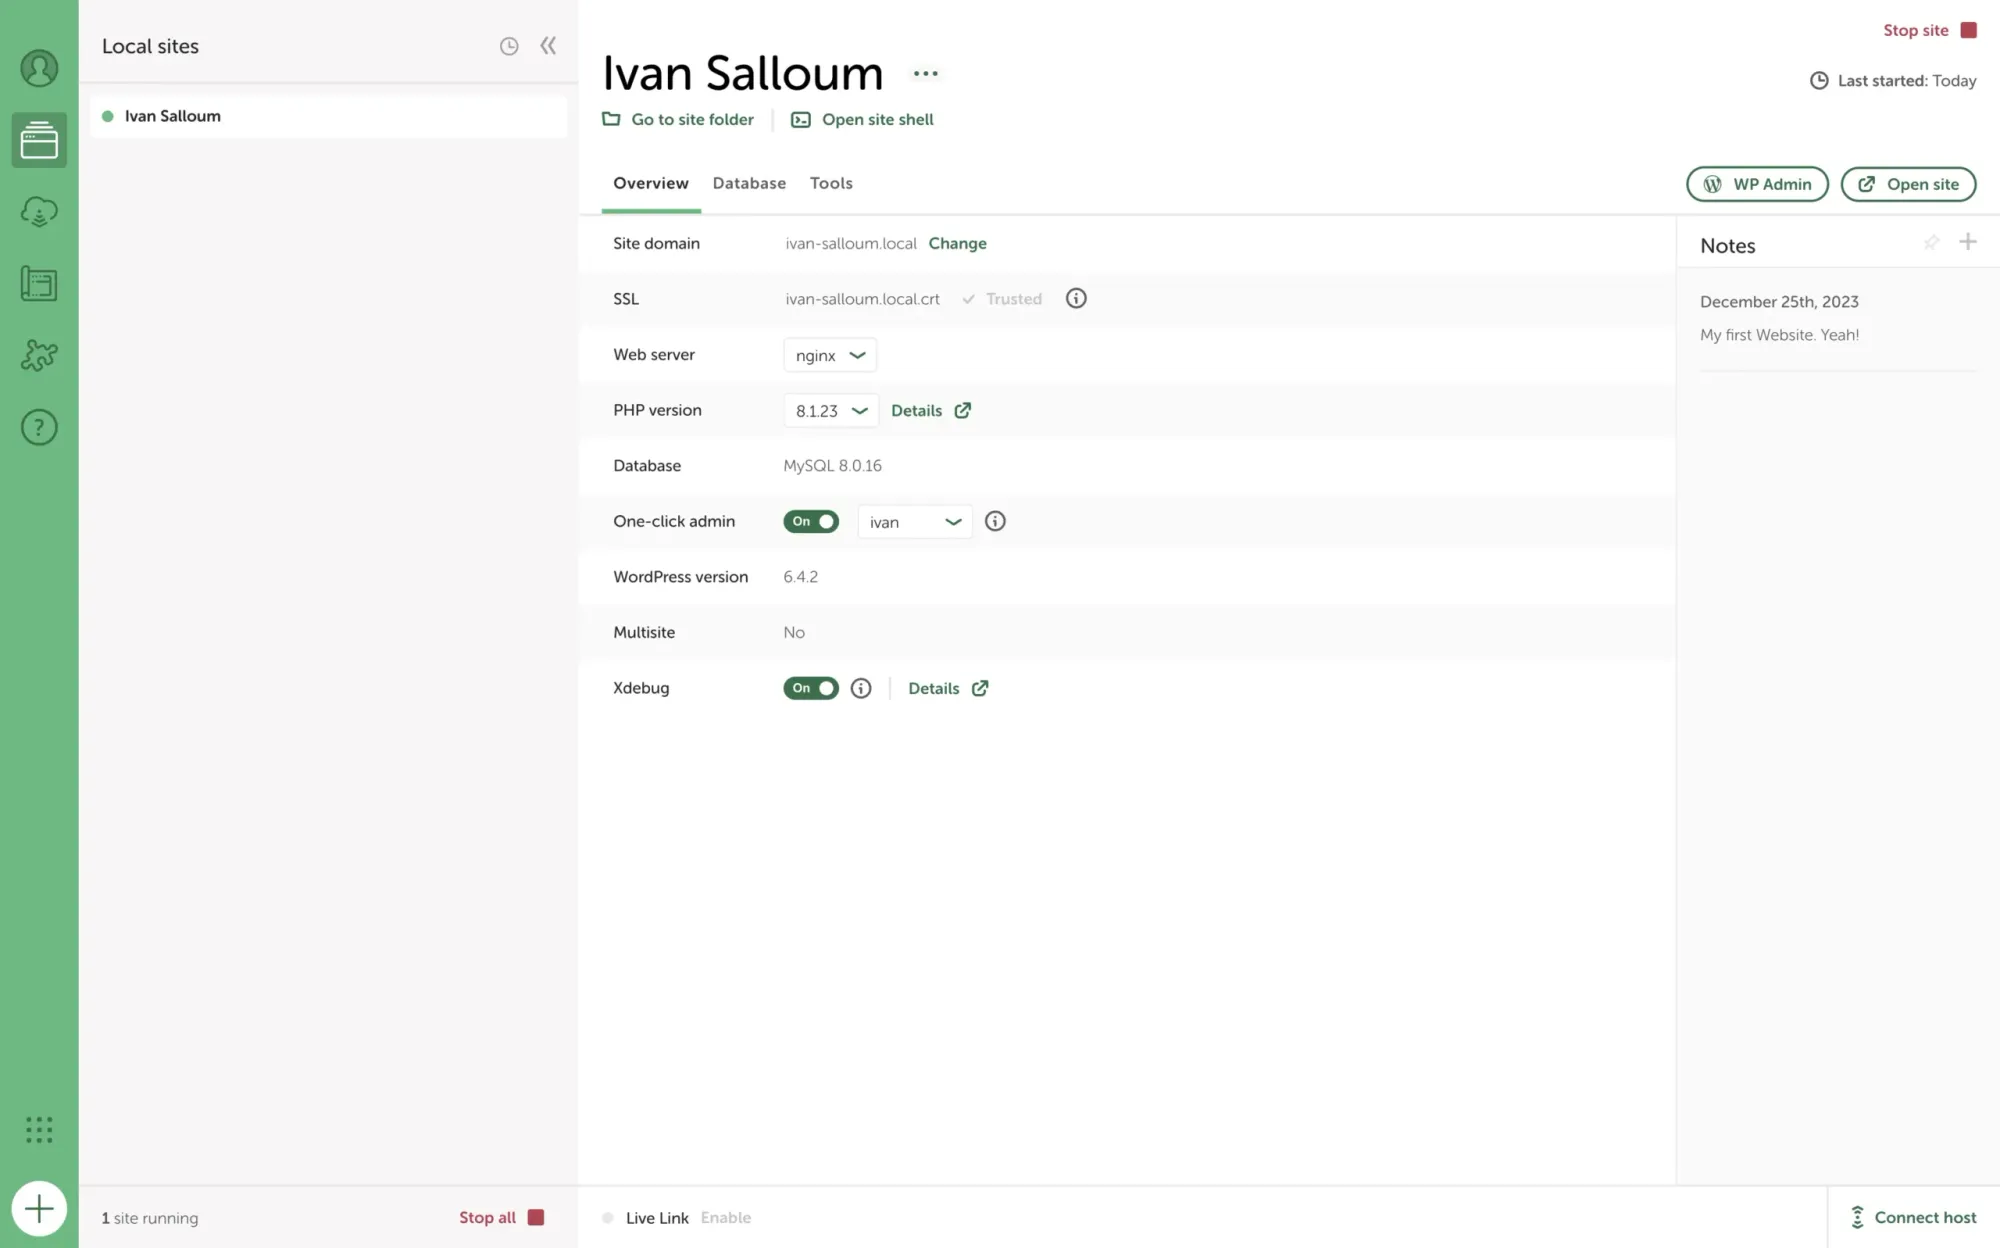
You can launch the site in your browser by clicking on the Open Site button.
To directly access the dashboard, click on the WP Admin button. For this, make sure to enable the One-click admin option and select the user you wish to log in with.
Remember, even if you chose an environment while creating the site, you can still change the web server and PHP version later if needed.
You can enable Xdebug if you want. It helps in troubleshooting complex PHP issues.
See the notes sidebar? That's there because I installed an add-on called Notes. Feel free to explore the add-ons section and install any that you find useful.
If you click on the three dots next to the site's name, you will see a list of options.
You can open the site or go directly to the admin dashboard. You have options to stop, restart, or start the site. Additionally, you can clone or export the site.
Creating a blueprint of the site's current state is possible too, allowing you to use it as a template for new sites.
There's also the option to create a new group and move the site into it.
Moreover, you can change the domain, rename the site, or delete it.
Database
The Database section provides information about your database and includes a tool called Adminer.
This tool allows you to connect to and manage your database directly in the browser.
By clicking on the Open Adminer link, a new tab will open in your browser where you can manage the database effectively.
Tools
In the Tools section, you'll find useful tools like Mailhog. It helps you see emails from your WordPress sites.
Just click on the Open Mailhog link, and you can check these emails in your browser.
Another handy tool is Live Links. This allows you to create a shareable link of your local site, which is great for showing your work to clients. You can share the live link online, giving others access to view your site.
However, to use this feature, you need to have a Local account. Feel free to create one. It's free.
Taking Your Site Live
After you've finished editing and preparing your site, it's time to make it live and publicly accessible. But how do you do that? Let me guide you through it.
If you're using WP Engine or Flywheel, you can utilize the Connect feature. However, I'll show you a method that works with any hosting provider.
Firstly, install and activate the All-in-One WP Migration plugin on both your local site and your live site.
All-in-One WP Migration on WordPress.org →
Next, on your local site, navigate to the plugin settings and select Export from the menu.
Replace the URL of your local site with the URL of your live site, then export it. Choose the EXPORT TO FILE option to proceed.
Once the export process is complete, you can download the file that has been generated.
Now, go to your live site, access the plugin settings, and choose Import from the menu.
Then, upload the file you just downloaded. You’ll receive a warning that this process will overwrite the entire website, including the database, media, plugins, and themes. This is expected and exactly what we need to do.
And that's it!
Conclusion and Final Thoughts
I hope this guide has been a valuable resource for learning how to install and use WordPress locally.
By working in a safe, offline environment, you can build and fine-tune your website without the pressure of being live. Once you're ready, taking your site live will be a smooth process with the steps we've covered.
If you found value in this guide or have any questions or feedback, please don't hesitate to share your thoughts in the discussion section.
Your input is greatly appreciated, and you can also contact me directly if you prefer.